How to Build a WooCommerce AI Agent in 10 Minutes (2026)

TL;DR
Building a WooCommerce AI chatbot takes about 10 minutes and requires no coding. With YourGPT, you can train the chatbot on your store data, connect WooCommerce using REST API and webhooks, answer product and order questions, capture leads, support cart recovery, and extend the same AI assistant across your website, WhatsApp, Instagram, and other messaging channels.
Running a WooCommerce store means answering the same customer questions every day: “Where is my order?”, “How long does shipping take?”, “Can I return this?”, “Which size should I buy?”, and “Is this product available?”
During business hours, your support team may handle these conversations manually. But after hours, during weekends, or during traffic spikes, slow replies can lead to abandoned carts, missed sales, and frustrated customers.
A WooCommerce AI agent helps solve this problem.
Instead of forcing shoppers to search through product pages, FAQs, shipping policies, and contact forms, an AI agent can give instant answers using your own store data. It can recommend products, explain return policies, answer shipping questions, collect leads, support order-related queries, and guide customers toward checkout.
In this blog, you will learn how to build a WooCommerce AI agent using YourGPT and connect it with your WordPress store. You will set up WooCommerce REST API access, configure webhooks, train the AI assistant on your store content, and launch it as a 24/7 shopping assistant.
What You’ll Need
Before you begin setting up your WooCommerce AI chatbot, make sure you have a few basic things ready. The setup is beginner-friendly, so you do not need coding skills or developer support.
Essential Requirements
To get started, you will need:
- A WooCommerce store running on WordPress
- Administrator access to your WordPress dashboard
- An active YourGPT account
- Access to WooCommerce settings
- Your WooCommerce store URL
Optional but Helpful
You can also prepare a few extra resources to make your chatbot more accurate and useful:
- Product catalogue or WooCommerce product export
- Existing customer support scripts
- Shipping policy
- Return and refund policy
- Payment information
- Size guides or product buying guides
- Warranty details
- FAQ page or help document
- Top 10–15 customer questions your team receives often
Once these are ready, you can complete most of the setup directly from your WordPress and YourGPT dashboards. The chatbot can be installed, customised, trained, and launched without editing code.
Step 1: Choose Your WooCommerce AI Chatbot Platform
Your setup begins with choosing the right AI chatbot platform. The platform you select will decide how easily you can install the chatbot, how well it works with WooCommerce, and how useful it becomes for customers.
A normal website chatbot may only answer basic FAQs. A WooCommerce chatbot should go further. It should understand product questions, shopping intent, stock-related queries, order support, and customer journeys.
When comparing AI chatbot platforms for WooCommerce, look for these key features:
- Native WordPress integration for quick plugin-based setup
- WooCommerce support for products, orders, stock, and customer workflows
- Smart AI responses that understand shopping intent, not just keywords
- Product recommendations to help shoppers find the right item
- Lead capture for visitors who are interested but not ready to buy
- Cart recovery workflows for reachable visitors or connected channels
- Human handoff when a shopper needs your support team
- Multi-channel deployment for WhatsApp, Instagram, Messenger, Telegram, and more
- No-code customisation so your team can manage the chatbot without a developer
Choosing the right platform at the beginning makes the rest of the setup much easier. It also ensures your chatbot can do more than answer basic questions it can capture leads, support customers, and guide visitors toward meaningful actions.
Why WooCommerce Users Choose YourGPT
YourGPT is built for businesses that want AI automation without technical complexity. It works with WordPress and WooCommerce, lets you train your chatbot on your own business data, and allows you to deploy the same AI agent across multiple channels.
Here’s what makes it useful for WooCommerce stores:
- Quick WordPress plugin installation
- WooCommerce integration for store-specific use cases
- AI agents that can be trained on product pages, FAQs, policies, and documents
- Lead capture for interested shoppers
- AI Studio for building custom workflows visually
- Multi-channel support for website chat, WhatsApp, Instagram, Messenger, Telegram, email, and more
- Customisable widget design to match your store branding
You’ll spend the first few minutes installing the plugin, creating your YourGPT account, and setting up your AI Agent before connecting WooCommerce.
Step 2: Install the YourGPT WordPress Plugin
Adding YourGPT to your WordPress site takes just a couple of minutes. The official plugin manages the entire setup automatically, you do not need to manually configure.
Installation Process:
- Log into your WordPress admin panel and navigate to your website’s admin area (usually
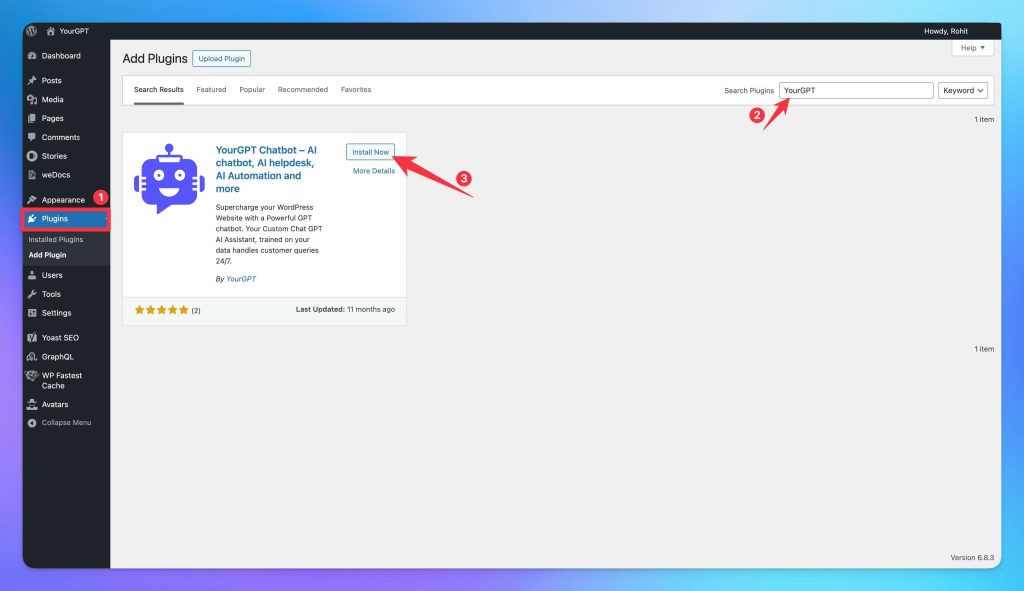
yoursite.com/wp-admin) - Access the Plugins section in the left sidebar and select Add New.
- Search for “YourGPT” in the search bar. To find YourGPT WordPress Plugin.
- Locate the official plugin, click the Install Now button, and wait for the confirmation.
- Activate the plugin by clicking the “Activate” button that appears
This is where you will later paste your Widget ID and enable the chatbot on your WooCommerce store.
The plugin setup does not require HTML, CSS, PHP, or manual script installation.
Step 3: Create Your YourGPT Account
Before you connect the chatbot to your WooCommerce store, you need a YourGPT account.
How to Create Your Account
- Visit YourGPT and click “Get Started”
- Enter your business email and create a secure password.
- Verify your email when you receive the confirmation link.
Once you finish, your dashboard you can create your first AI agent, train it on your store data, customise the widget, connect WooCommerce, and deploy the chatbot to your website.
Step 4: Create Your WooCommerce AI Agent
Here’s where your chatbot truly becomes your store assistant, helping shoppers find products, answer questions, and move smoothly toward checkout.
To get started, open the YourGPT dashboard and click Create New AI Agent.
Give your agent a clear, memorable name that fits your store or feels friendly and approachable. For example:
- Mia from [Store Name]
- [Store Name] Shopping Assistant
- YourGPT Store Assistant
- AI Product Expert
Next, choose the AI model that fits your store best:
- Claude 4.5 Haiku works well for conversational shopping support, product questions, FAQs, and customer service.
- GPT 5 works well for larger catalogues, complex product questions, and deeper reasoning.
Now, define your chatbot’s tone and purpose. For example:
“You are a helpful AI shopping assistant for [Store Name]. Help visitors find the right products, answer questions about product details, shipping, returns, payments, availability, and order tracking. Keep answers friendly, clear, and concise. Recommend relevant products when helpful, and guide shoppers toward checkout when they are ready to buy.”
Set how you want it to sound based on your brand:
- Friendly and casual for lifestyle stores.
- Warm and helpful for fashion, beauty, and home brands.
- Professional for B2B or premium stores.
- Direct and practical for electronics, tools, or technical products.
You can always refine these settings later after reviewing real customer conversations. The goal is to make your chatbot feel natural, helpful, and aligned with your store’s personality.
Step 5: Train Your AI Chatbot on Your Store Data

This is where your chatbot starts learning about your business what you sell, how you communicate, and the questions your customers ask most often. The more relevant data you provide, the smarter and more accurate it becomes.
Train Using Your Website Content
In your YourGPT dashboard, go to Training → Add Data Source → Website.
Enter your WordPress URL, and YourGPT will automatically scan your site to collect and index important content like web pages, blogs, and docs FAQs. The training process depend on your size of the training data usually takes 2–5 minutes.
Add More Knowledge (Recommended)
You can make your chatbot even more capable by adding additional data sources:
- Upload files such as documents, PDFs.
- Add FAQs or product details that aren’t already on your site
- Connect cloud platforms like Google Drive, Notion, or Confluence for automatic syncing
Start with essential information pricing, product details, policies, and troubleshooting guides, Training with the FAQs is the Best way. As your chatbot interacts with users, you can add more content over time to improve accuracy.
Step 6: Connect WooCommerce Using REST API and Webhooks
This is the most important step for a WooCommerce chatbot.
Training the chatbot on your website helps it understand static content. WooCommerce integration helps it work with live store information such as products, orders, customers, prices, and stock updates.
In your YourGPT dashboard, go to:
Integrations → WooCommerce
YourGPT will provide the WooCommerce connection details you need, such as your store URL, REST API credentials, webhook delivery URL, and webhook secret.
Now open your WordPress admin dashboard.
Go to:
WooCommerce → Settings
Then click the Advanced tab.
Create WooCommerce REST API Credentials
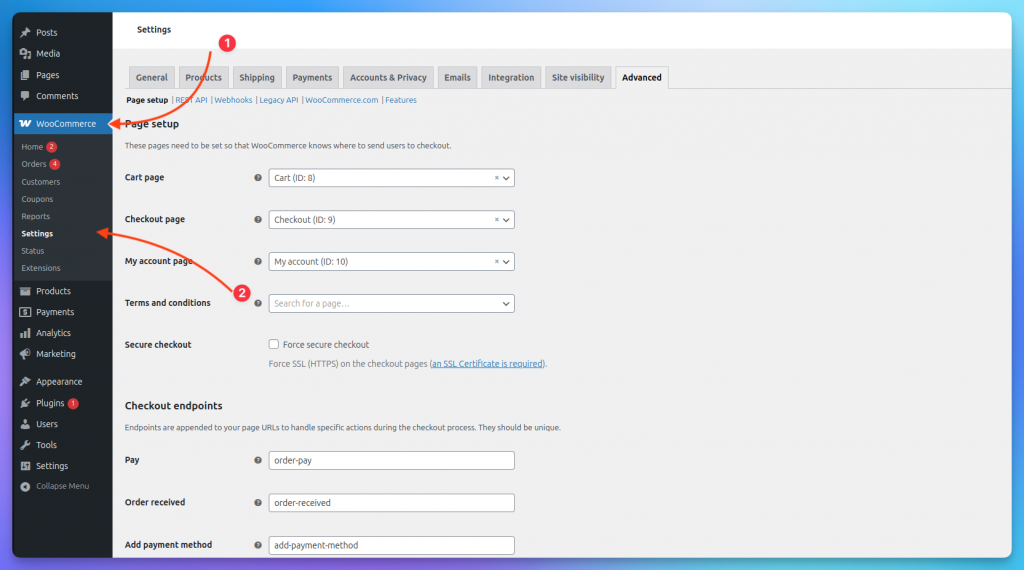
Inside the Advanced section, click:
REST API
Then choose:
Add Key
Give the key a clear name, such as:
YourGPT WooCommerce Integration
Select the user account that has admin permission.
For Permissions, choose the access level recommended inside your YourGPT WooCommerce integration screen.
For lookup-only use cases, Read access may be enough. For advanced workflows that need to update store information, use the permission level recommended by YourGPT.
Click:
Generate API Key
WooCommerce will generate:
- Consumer Key
- Consumer Secret
Copy both values and paste them into the YourGPT WooCommerce integration screen.
Keep these credentials private.
Add WooCommerce Webhooks
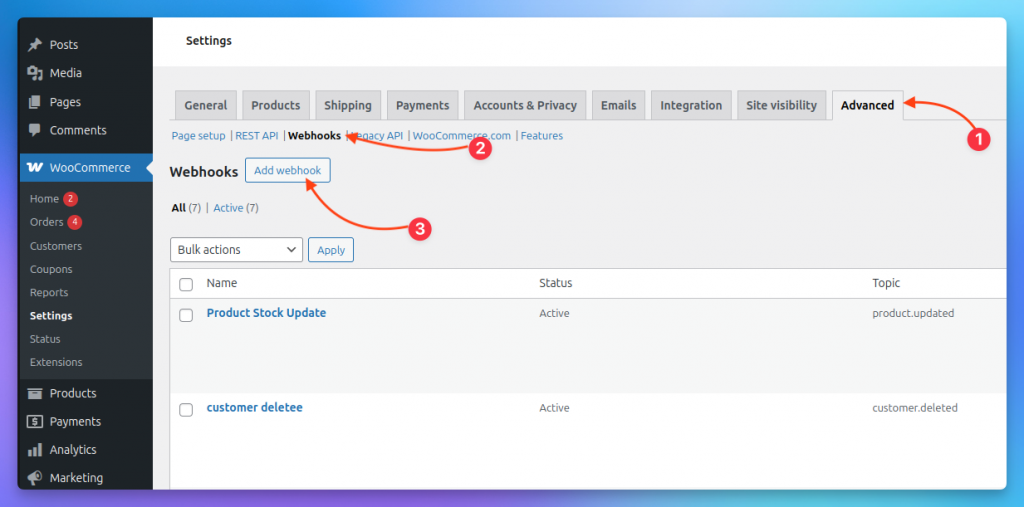
After adding REST API credentials, return to:
WooCommerce → Settings → Advanced
Click:
Webhooks
Then click: Add webhook
Fill in the Webhook Data
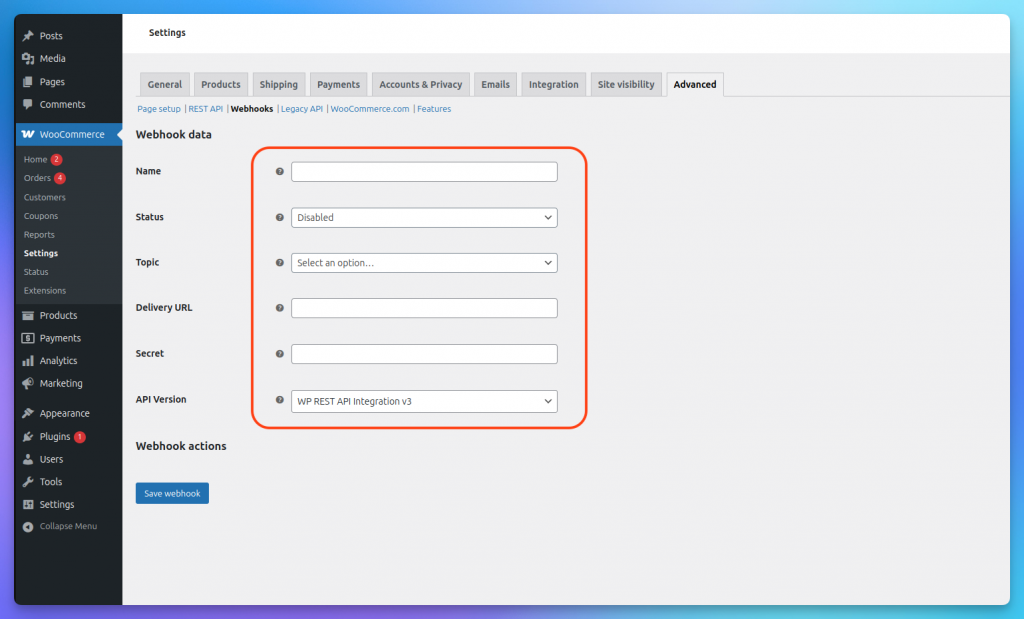
WooCommerce will now show the Webhook data form.
Fill it in using the details provided by YourGPT.
Use these settings:
Name
Choose a clear name, such as:
YourGPT WooCommerce Sync
For specific events, you can use names like:
- Product Stock Update
- New Order Sync
- Order Status Update
Status
Change the status from Disabled to:
Active
The webhook will not send data if it stays disabled.
Topic
Choose the WooCommerce event you want to sync with YourGPT.
Common topics include:
- Product updated for product changes, price changes, and stock updates.
- Order created for new orders.
- Order updated for order status and tracking workflows.
- Customer created for new customer events.
Use the topic recommended in your YourGPT WooCommerce integration screen.
Delivery URL
Paste the webhook delivery URL provided by YourGPT.
Secret
Paste the secret key provided by YourGPT, or create a secure secret and use the same value in both WooCommerce and YourGPT.
Keep this secret private. It helps verify that webhook requests are genuine.
API Version
Keep this set to:
WP REST API Integration v3
Then click:
Save Webhook
What the WooCommerce Connection Enables
Once WooCommerce is connected, your chatbot can support more advanced shopping experiences using live store data.
It can help with:
- Live product information
- Product availability questions
- Stock-related answers
- Product recommendations
- Order tracking support
- Customer workflows
- Product alternative suggestions
- Upsell and cross-sell suggestions
- Cart recovery workflows when the visitor has shared contact details or is reachable through a connected channel
For example, a shopper can ask:
“Is this available in blue?”
“Do you have size M in stock?”
“Where is my order?”
“Can you suggest something similar?”
Instead of giving a generic response, the chatbot can answer using your WooCommerce store data.
Before moving ahead, test one WooCommerce event. For example, update a product, change the stock quantity, or update an order status. Then confirm that the change is received correctly inside YourGPT.
Step 7: Customise Your Chatbot Appearance
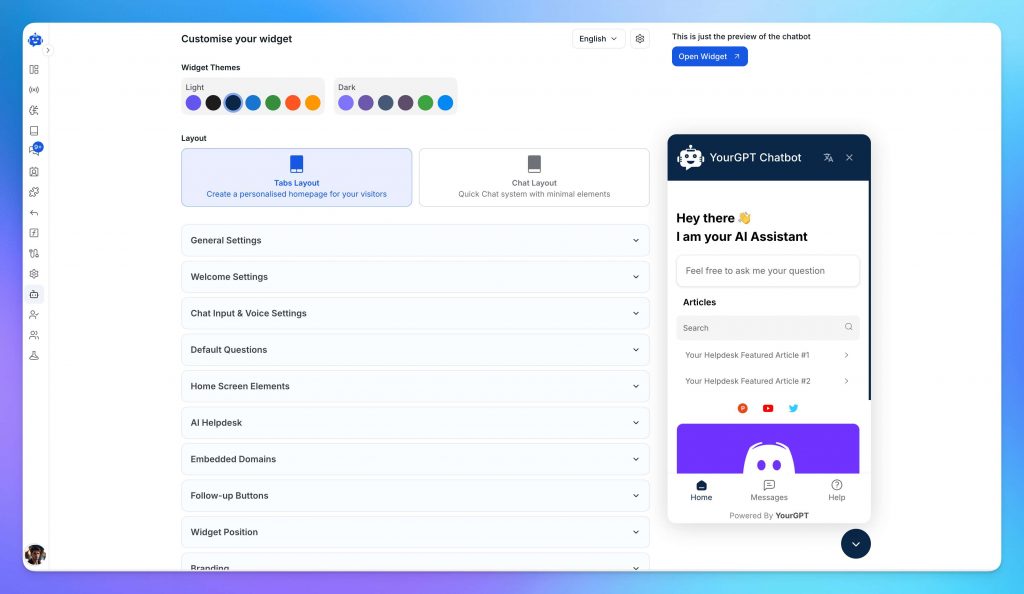
Your chatbot should look like part of your store, not a third-party tool added at the last minute.
Open the Appearance or widget customisation panel in your YourGPT dashboard.
Here, you can customise:
- Widget colour
- Chatbot icon or avatar
- Store logo
- Widget position
- Welcome message
- Button style
- Chat window size
- Brand tone
Use a short welcome message that encourages shoppers to ask questions.
Examples:
“Need help finding the right product?”
“Hi! I can help you track orders, check stock, or find products.”
“Looking for something specific? Ask me anything.”
You can also add quick-reply buttons for common actions:
- Track my order
- View return policy
- Find products
- Check shipping
- Talk to support
- Recommend a product
Quick replies reduce friction and make the chatbot easier to use, especially on mobile.
Before publishing, preview the widget on both desktop and mobile.
Step 8: Set Up Lead Capture
Not every shopper buys on the first visit. Lead capture helps you collect contact details from interested visitors so you can follow up later.
In your YourGPT dashboard, go to:
General Settings → Leads
Then enable the lead form.
Add only the fields you really need. For most WooCommerce stores, this is enough:
- Name
You can also add:
- Phone number
- Product interest
- Order number
- Budget range
- Company name
For e-commerce, keep the form short. Long forms can reduce conversions.
For a more advanced setup, use AI Studio to design a complete lead journey. For example, your chatbot can:
- Ask what the shopper is looking for
- Recommend a product
- Offer a discount code
- Capture email
- Sync the lead to your CRM or email tool
This turns your chatbot into both a support tool and a sales assistant.
Step 9: Connect Your Chatbot to WordPress and Go Live
The final connection takes less than a minute.
- In your YourGPT dashboard, go to: Integration
- Copy your Widget ID.
- Open your WordPress admin panel.
- Click YourGPT in the left sidebar.
- Paste the Widget ID.
- Turn Enable Chatbot to ON.
- Save your changes.
Your WooCommerce AI chatbot is now live on your store.
Before announcing it, open your store in an incognito browser tab and test common questions:
“Where is my order?”
“What is your return policy?”
“How long does shipping take?”
“Do you have this product in stock?”
“Can you recommend something under $50?”
“Do you have this in another colour?”
Also test the widget on mobile. Many WooCommerce shoppers browse from phones, so the chatbot should be easy to open, read, and use on smaller screens.
Finally, test one WooCommerce webhook event. Update a product, stock quantity, or order status, then check whether the change syncs correctly.
Step 10: Deploy Across Multiple Channels
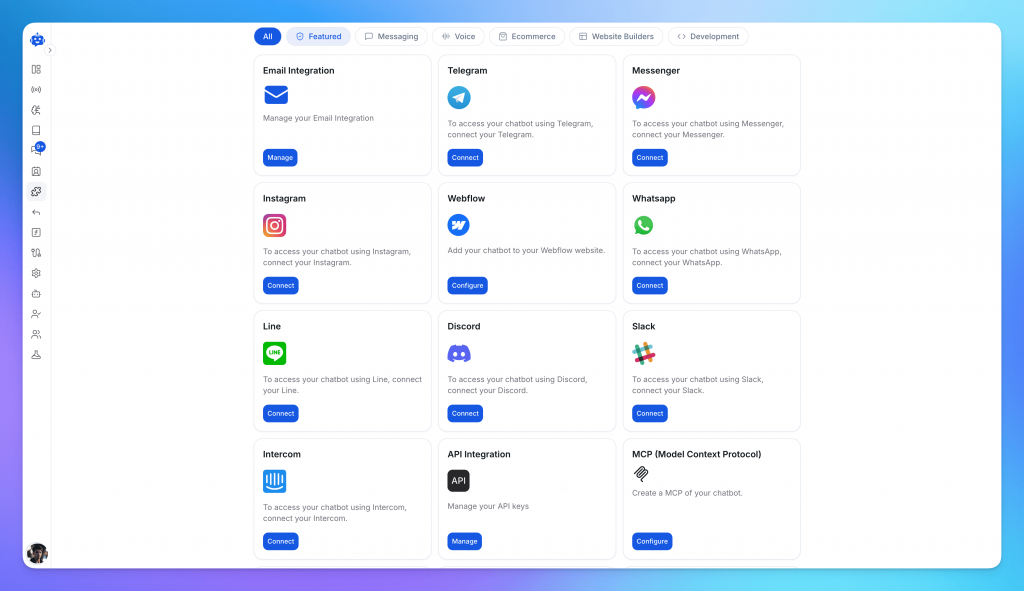
Your chatbot does not have to stay only on your WooCommerce website.
Many shoppers prefer messaging channels such as WhatsApp, Instagram, Messenger, or Telegram. With YourGPT, the same AI agent can be deployed across multiple channels from the same dashboard.
You can connect it to:
- WhatsApp Business
- Instagram Direct
- Facebook Messenger
- Telegram
- Slack
- Voice or phone workflows
The benefit is consistency.
A shopper can ask a question on your website, Instagram, or WhatsApp, and the same AI agent can respond using the same store knowledge.
This is especially useful for WooCommerce stores that sell through social channels or receive product questions through Instagram DMs.
Troubleshooting Common Issues
Most WooCommerce AI chatbot setups work smoothly. But if something does not work as expected, use the checks below to fix common issues quickly.
1. Chatbot Widget Not Appearing
First, check that the YourGPT plugin is installed and activated in WordPress.
Go to:
WordPress Dashboard → YourGPT
Check that:
- Widget ID is correct
- Chatbot is enabled
- The page is not excluded by display rules
- The correct chatbot is selected
If the widget still does not appear:
- Clear your caching plugin
- Clear your browser cache
- Test in an incognito tab
- Temporarily disable script minification or JavaScript delay
- Check for plugin or theme conflicts
Caching, delayed scripts, and JavaScript conflicts are common reasons the widget does not load immediately.
2. WooCommerce Products Not Showing
Go to:
YourGPT → Integrations → WooCommerce
Check that the WooCommerce connection is active.
Then confirm that:
- REST API keys are correct
- Store URL is correct
- Products are published
- Products are visible in WooCommerce
- Products are not private, draft, or hidden
- Manual sync has completed
- Webhooks are active
If you recently added or edited products, run a manual sync if available and test again after a few minutes.
3. REST API Connection Not Working
Go to:
WooCommerce → Settings → Advanced → REST API
Check that:
- Consumer Key is copied correctly
- Consumer Secret is copied correctly
- API key has the right permissions
- Store URL uses the correct https:// domain
- WordPress permalinks are not set to Plain
If the connection still fails, regenerate the API keys and reconnect WooCommerce in YourGPT.
4. Webhook Not Sending Data
Go to:
WooCommerce → Settings → Advanced → Webhooks
Open the webhook and check that:
- Status is set to Active
- Topic is correct
- Delivery URL matches YourGPT
- Secret matches YourGPT
- The webhook was saved successfully
To test it, update a product, change stock quantity, or update an order status.
You can also check webhook logs under:
WooCommerce → Status → Logs
If the webhook shows repeated failures, check the delivery URL, secret, firewall, or security plugin settings.
5. Wrong Webhook Topic Selected
Choose the webhook topic based on what you want the chatbot to track.
Use product topics for:
- Product updates
- Stock changes
- New products
Use order topics for:
- New orders
- Order status updates
- Order tracking
Use customer topics for:
- New customers
- Customer updates
Use separate webhooks if you want to track multiple WooCommerce events.
6. AI Giving Incorrect Answers
Wrong answers usually happen when the chatbot has missing, outdated, or conflicting information.
Check and update:
- Product information
- Shipping policy
- Return and refund policy
- Payment details
- Warranty information
- Size guides
- FAQs
- AI instructions
Also update the chatbot whenever you change prices, promotions, stock, shipping rules, or return policies.
Test the chatbot with real customer questions before going live.
7. Chatbot Loading Slowly
A slow chatbot is often caused by overall website performance issues.
Check for:
- Large images
- Too many plugins
- Slow hosting
- Heavy theme files
- Script conflicts
- Caching issues
Compress images, remove unused plugins, and test your site speed after each change.
8. Order Tracking Not Working
If the chatbot cannot answer order-related questions, check that:
- WooCommerce connection is active
- Order webhook is enabled
- Correct order topic is selected
- API permissions allow order access
- Customer verification is enabled
For safety, the chatbot should verify the customer before showing order details.
A good flow is:
- Ask for the order number
- Ask for email or phone verification
- Show the order status
- Offer human support if verification fails
9. Contact Support
If the issue continues, contact support with the details needed to investigate the problem faster.
Include:
- Screenshot of the problem
- Page URL where the issue appears
- Browser and device used
- WordPress version
- WooCommerce version
- YourGPT plugin version
- Webhook topic
- Error message, if any
You can get help from:
- Visit the YourGPT Help Center for detailed troubleshooting guides
- Join the YourGPT Discord community to get answers from other users
- Reach out via support@yourgpt.ai or live chat on the YourGPT website
Pro Tip: Do not share API keys, webhook secrets, passwords, or private customer data when asking for help.
Next Steps: Optimising Your WooCommerce AI Chatbot
Your chatbot is live. Now make it more useful for real shoppers by improving answers, recommendations, and support workflows inside YourGPT.
1. Review Real Customer Conversations
Your chatbot conversations show what shoppers ask before they buy. Check them weekly for repeated questions about delivery, sizing, returns, discounts, compatibility, or order status. Add common answers to your knowledge base to improve accuracy.
2. Keep Store Information Updated
WooCommerce stores change often, so your chatbot should stay updated too. Refresh your knowledge base whenever you change product prices, stock, shipping rules, return policies, discounts, payment methods, warranties, size guides, or product descriptions.
3. Improve Product Recommendations
A good chatbot should help shoppers choose the right product, not just answer questions. Train it with best-selling products, categories, bundles, size and fit details, compatibility rules, buying guides, and use cases. Make sure it only recommends products that are available and relevant.
4. Build Simple Workflows
Use YourGPT workflows to guide customers through key shopping moments. Start with product finder, cart support, order support, and human handoff workflows. Keep each flow short so shoppers get help quickly without going through long forms.
5. Track Performance
Review chatbot performance regularly. Track total conversations, successful answers, unanswered questions, recommendation requests, leads collected, order tracking requests, and human handoff rate. Use these insights to improve your chatbot every week.
Related Reading
- WordPress AI Chatbot: Complete Guide for 2026
- Best WordPress Chatbots in 2026: Top 7 AI Chatbot Plugins Compared
- 6 Best AI Chatbot Plugins for WordPress in 2026
- How AI Chatbots Resolve Common WooCommerce Challenges
WooCommerce AI Chatbot FAQs
Do I need coding skills to build a WooCommerce AI chatbot? ▼
No. You can set up a WooCommerce AI chatbot using the YourGPT WordPress plugin and dashboard without writing code. You only need to install the plugin, create your AI agent, connect your store, and enable the chatbot on your website.
How long does it take to set up a WooCommerce AI chatbot? ▼
A basic WooCommerce AI chatbot can be set up in around 10 minutes. Larger stores may take more time if you want to upload extra product documents, configure multiple webhooks, or build advanced automation workflows.
Can the chatbot answer WooCommerce product questions? ▼
Yes. Once trained on your store data, the chatbot can answer product-related questions, explain features, recommend items, compare products, and guide shoppers toward the right purchase.
Can it check product variants like size, colour, or style? ▼
Yes. If your WooCommerce product data and integration are configured correctly, the chatbot can help with variant-related questions such as size, colour, style, availability, and similar product options.
Can the chatbot help with order tracking? ▼
Yes. With the right WooCommerce connection and order-related setup, the chatbot can help customers with order status and tracking-related questions. For privacy, it should ask for safe verification details before sharing order information.
Can it help recover abandoned carts? ▼
Yes. The chatbot can support cart recovery workflows when the visitor has shared contact details or is reachable through a connected channel such as email, WhatsApp, Messenger, or Instagram.
Do I need WooCommerce webhooks? ▼
Webhooks are recommended if you want YourGPT to receive live WooCommerce events such as product updates, order changes, customer events, or stock-related updates. They help keep your chatbot connected to important store activity.
Which WooCommerce webhook topic should I choose? ▼
Choose the webhook topic based on what you want to sync. Use Product updated for product and stock changes, Order created for new orders, Order updated for order status workflows, and Customer created for new customer events.
Will the chatbot slow down my WooCommerce store? ▼
The chatbot widget is designed to load without blocking the main website experience. If your store feels slow, check image size, hosting performance, theme scripts, caching plugins, and plugin conflicts.
Can I use the same chatbot on WhatsApp, Instagram, and other channels? ▼
Yes. You can deploy the same AI agent across your WooCommerce website, WhatsApp, Instagram, Messenger, Telegram, email, and other supported channels, so shoppers get consistent answers wherever they contact you.
Conclusion
Building a WooCommerce AI chatbot does not have to be complicated. Once you install the plugin, connect your store, add your product and policy information, and test a few common questions, you can launch a working shopping assistant with YourGPT.
The real value comes after launch. Review what shoppers ask, update your knowledge base, improve product recommendations, and refine support flows based on real conversations. This helps your chatbot become more accurate, useful, and aligned with how customers actually shop.
Start simple, then improve it every week. A well-trained WooCommerce AI chatbot can reduce repetitive support work, answer questions outside business hours, guide shoppers toward the right products, and create a smoother buying experience across your store.
Turn Your WooCommerce Store into a 24/7 AI Sales Assistant
Help customers instantly, answer product questions, recommend items, capture leads, and recover more sales with AI chat built for WooCommerce stores. No coding needed.
7-day free trial · No credit card required

Related posts